

 PRODUCT SUPPORT
LIV
Your comprehensive resource for installing, troubleshooting, and optimizing the LIV Smart Repellent System.
Whether you're performing a hub replacement, installing a new system from the ground up, or resolving app connectivity issues, you'll find step-by-step guidance for every stage of your installation. Browse our detailed installation instructions covering system components and mounting procedures, familiarize yourself with the LIV+2 app features and controls, or jump straight to troubleshooting for quick solutions to light sequences and connectivity challenges. Everything you need to deliver professional-grade mosquito protection is right here.
FAQs
Is LIV available in other countries besides the U.S.A.
As of right now, the LIV System is only available in the United States and cannot be shipped or sold outside the United States. This is because of various country-specific regulations and registration laws. If in the future, we decide to launch it in any other countries, we will update our website, https://www.thermacell.com under where to buy. Please make sure to check for any updates there.
Which power source is recommended for using LIV
What is the size of the repellency zone offered by the LIV System?
Each LIV repeller forms a 20-foot zone of protection (a 10-foot radius in any direction from the repeller). That's a minimum of 315 sq. ft. of coverage from each repeller.
Is the LIV Smart Mosquito Repellent System available anywhere outside of the United States?
Is LIV effective against other types of insects?
Are there any limitations or guidelines for the installation of LIV in proximity to water?
Installation
LIV is powerful technology - made simple. By following our straight forward process, installation is clean and efficient, set up is seamless and you will be mosquito free in no time.
- System Overview - What You Have, What it Does and What Matters Most
- Plan the Coverage Area - Decide What You're Protecting and Where
- Configure the System - Match the System to the Plan
- Install the Hardware - Build It
- Activate and Validate - Make Sure it Works
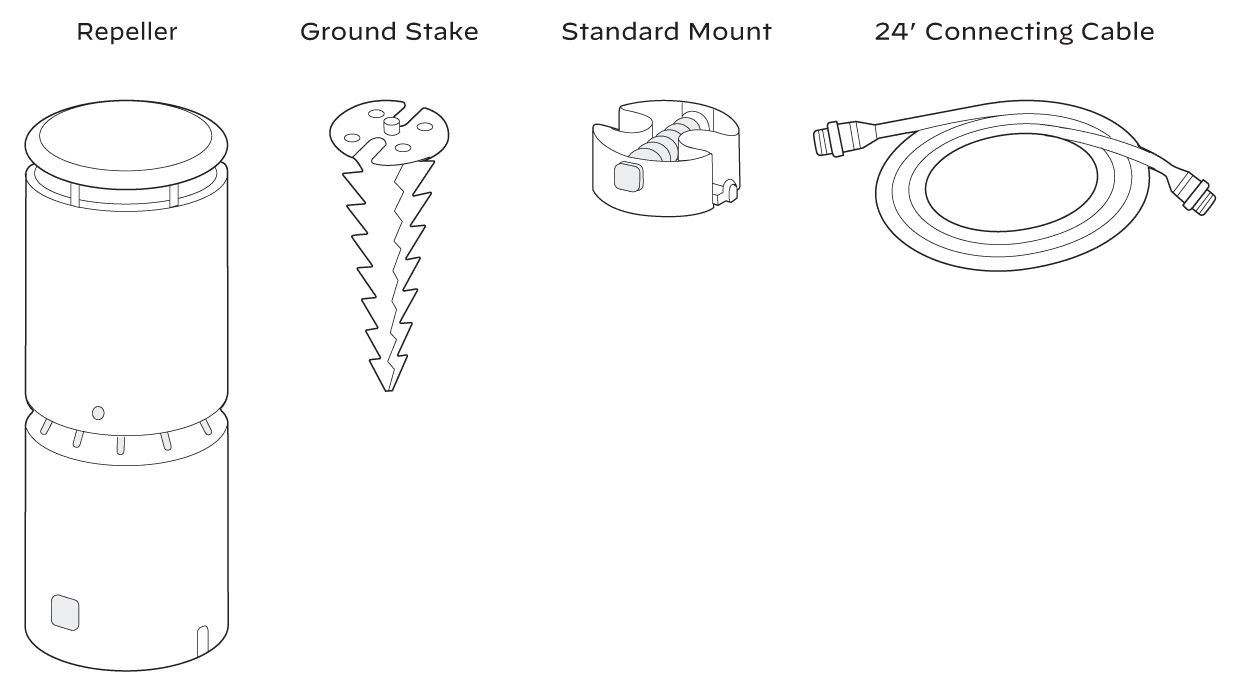
What Comes in the Repeller Box
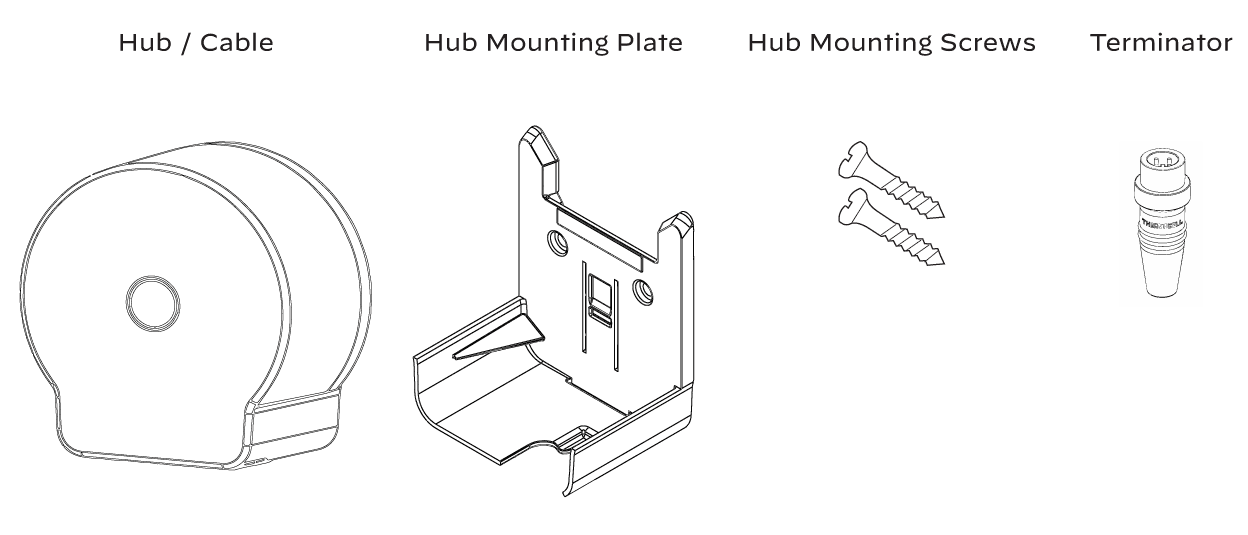
What comes in the Hub Box
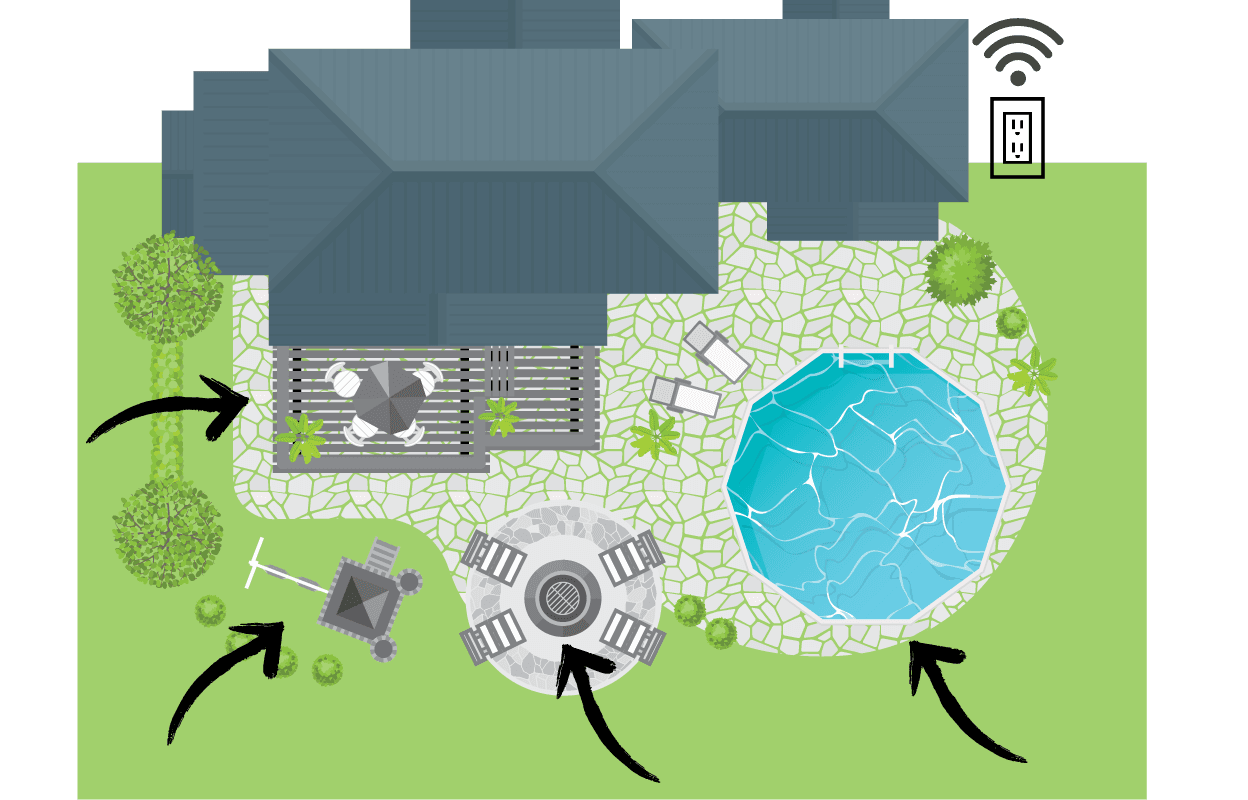
Before You Plan Your System
Coverage Area
- Is this a clear, defined area people use?
- How many repellers will it take to effectively cover the area?
Power and WiFi
- Is there a GFCI outlet within reach of the coverage area? 120V required
- Is there a WiFi signal nearby for setup and monitoring?
Layout and Cabling
- Can I run cables cleanly and safely?
- Do cable distances stay within system limits?
Environment
- Are there obstructions (dense plants, walls and water exposure) to plan around?
- Do I see good mounting options?
How to Approach Configuration
Survey Your Space
- Identify the areas you want to protect and where the hub can be mounted
- Confirm optimal repeller placement based on seating, power and WIFI access
Layout Repellers
- Repellers go in one direction starting from the hub. Repellers cannot split directions, nor do they circle back to complete a circuit.
- Place repellers on the ground where they will be installed
- Measure distances between repellers and from the first repeller to the hub
- Each hub can support up to five repellers
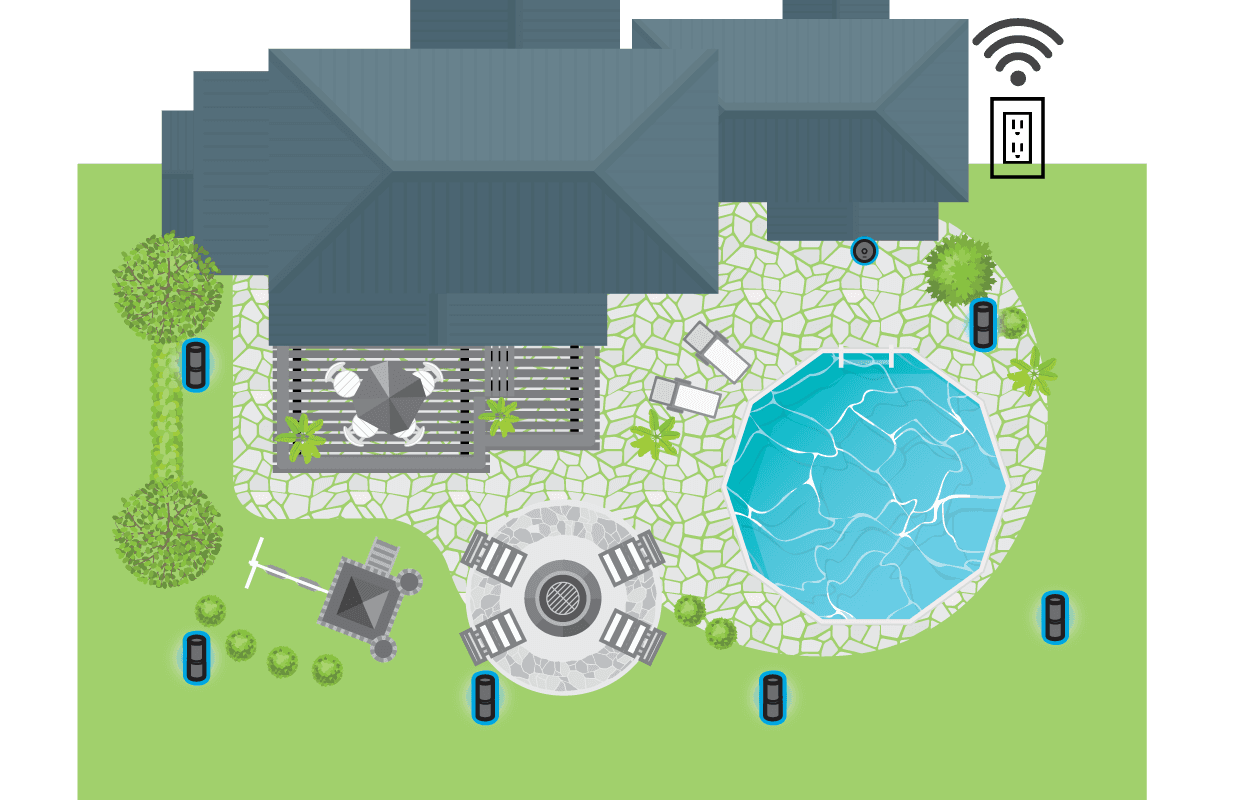
Create a Perimeter
- Build a perimeter around the spaces people use most
- Space repellers no more than 20 feet apart
- Place repellers within 10 feet of seating and gathering areas for best protection

Tools Needed
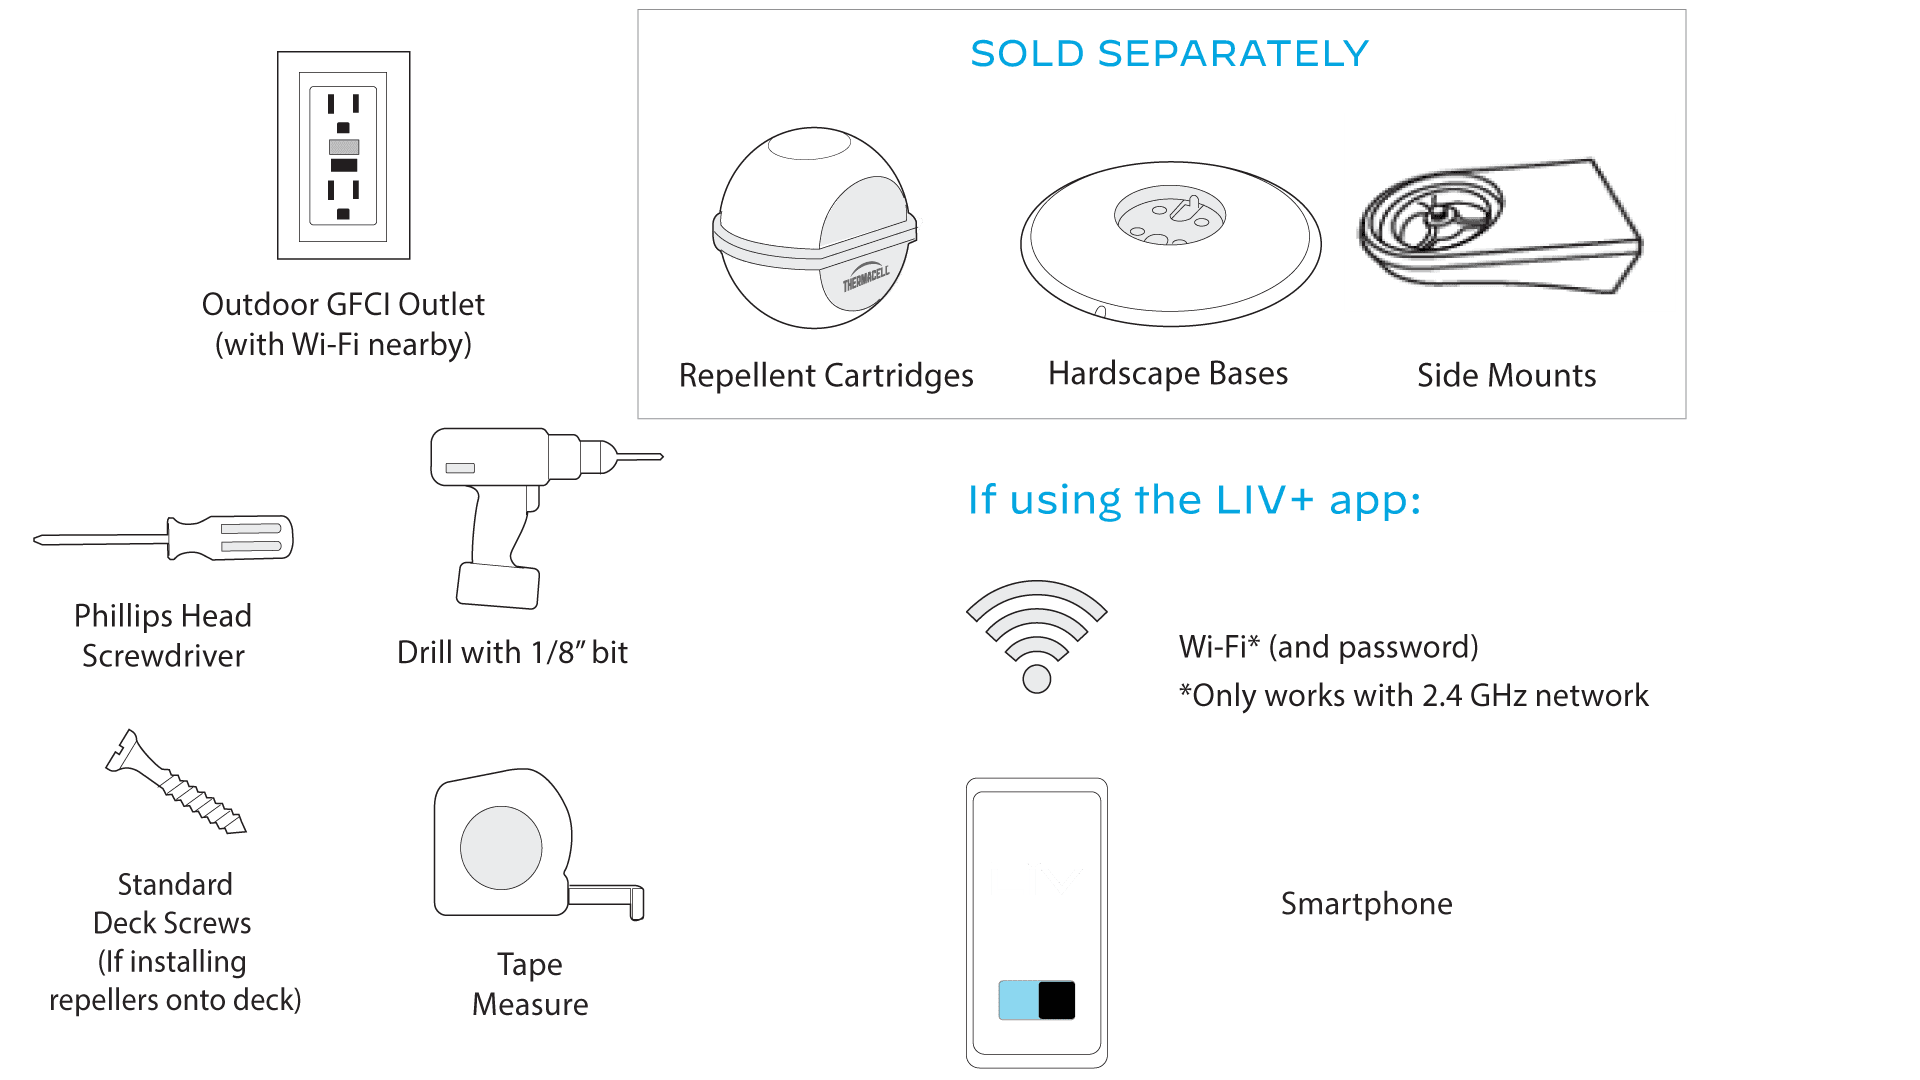
Mount the Hub
Choose the Right Location
- Within range of 2.4 GHz WiFi Network
- Within 6 feet of a GFCI Outdoor Outlet (120V)
- At least 30 inches off the ground to avoid water and snow
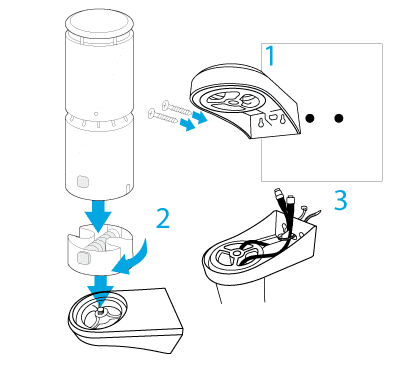
Mount the Hub
- Hub must be mounted vertically
- Use the provided mounting plate to mark screw holes
- Ensure the plate is level
- Drill holes and install the plate using the provided screws
Install the Hub
- Hang the hub securely on the mounting plate
- Ensure the power cable is fully inserted
- Route cables facing downward or protected from the elements
Leave the Hub Unplugged Until Testing Step
Mount the Repellers
Depending on your installation and selected hardware, follow the appropriate step below to attach a repeller.
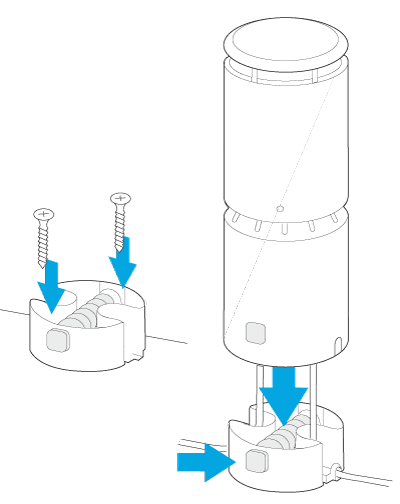
Standard Mount - Decks, Railings and Flat Wood Surface
- Secure the mount directly to the surface using deck screws
- Route cables through the cutout in the mount
- Slide the repeller onto the mount until it clicks into place
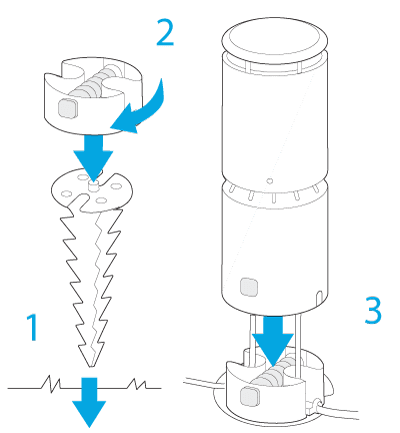
Ground Stake - Lawns, Garden Beds and Mulch Areas
- Push stake in by hand until just above ground level (Do not use a hammer or mallet)
- Twist the standard mount onto the stake until finger-tight
- Align push tabs and pass pigtail connectors through cutouts
- Slide the repeller onto the mount until it clicks
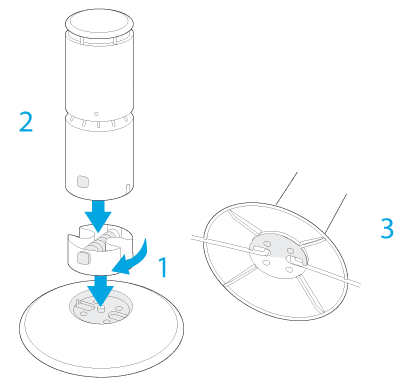
Hardscape Base - For Stone, Pavers, Decking, or Other Hard Surfaces Where Drilling is Not Desired
- Twist the standard mount into the threaded center of the base
- Pass pigtail connectors through the bottom of the base
- Slide the repeller onto the mount until it clicks
- Place base on surface, ensuring cables sit in the edge cutout
Side Mount - For Decks and Vertical Hard Services
- Position the side mount and mark hole locations
- Pre-drill two holes and secure side mount with appropriate screws
- Twist the standard mount onto the side mount
- Route cables through cutouts and install the repeller
- Secure cables with a zip tie.
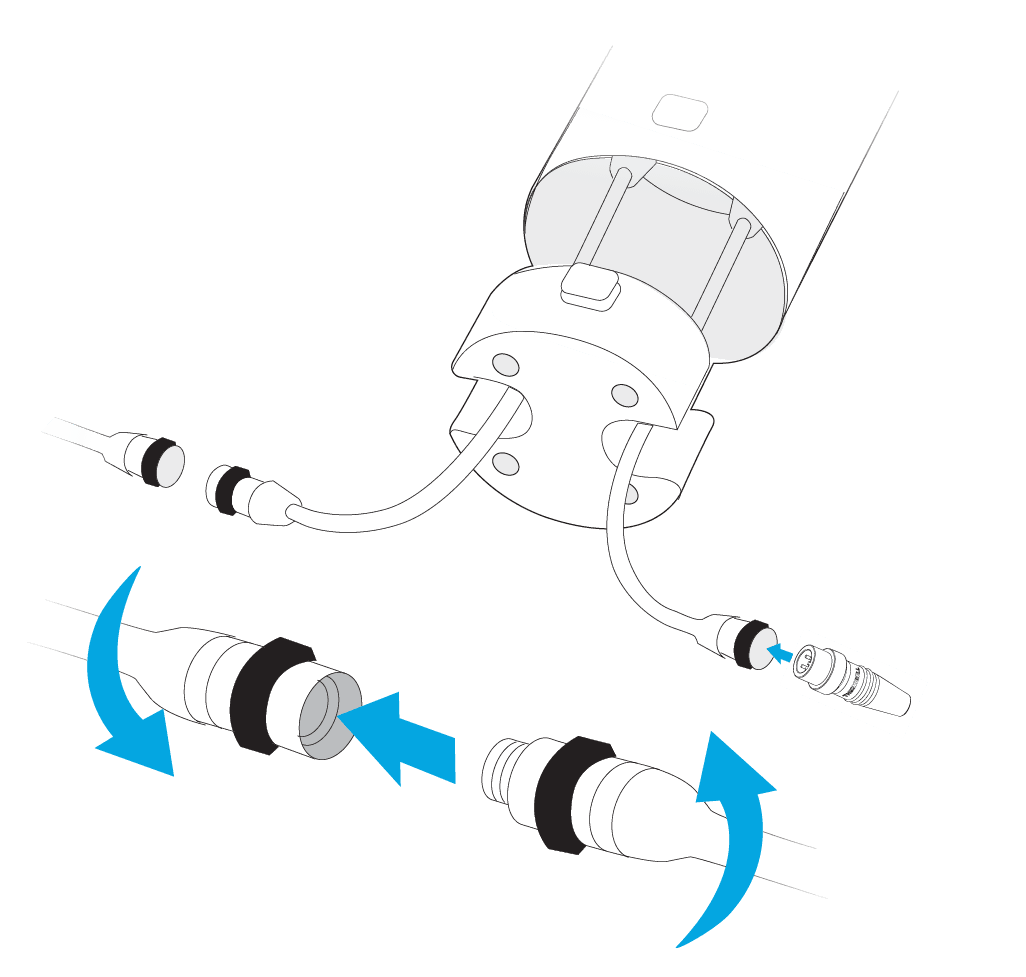
Connect the Cables - **MAKE SURE THE HUB IS UNPLUGGED**
Start at the hub
- Connect one end of a 24-ft cable to the hub
- Thread finger-tight only (do not over-tighten)
- Do not plug in the hub yet
Connect the first repeller
- Connect the other end of the cable to the first repeller pigtail
Continue the chain
- Connect each repeller to the previous one in the chain
- Route cables where they will be secured later
- Keep cables unburied for now
Finish the chain
- Place the terminator on the final repeller at the end of the longest chain
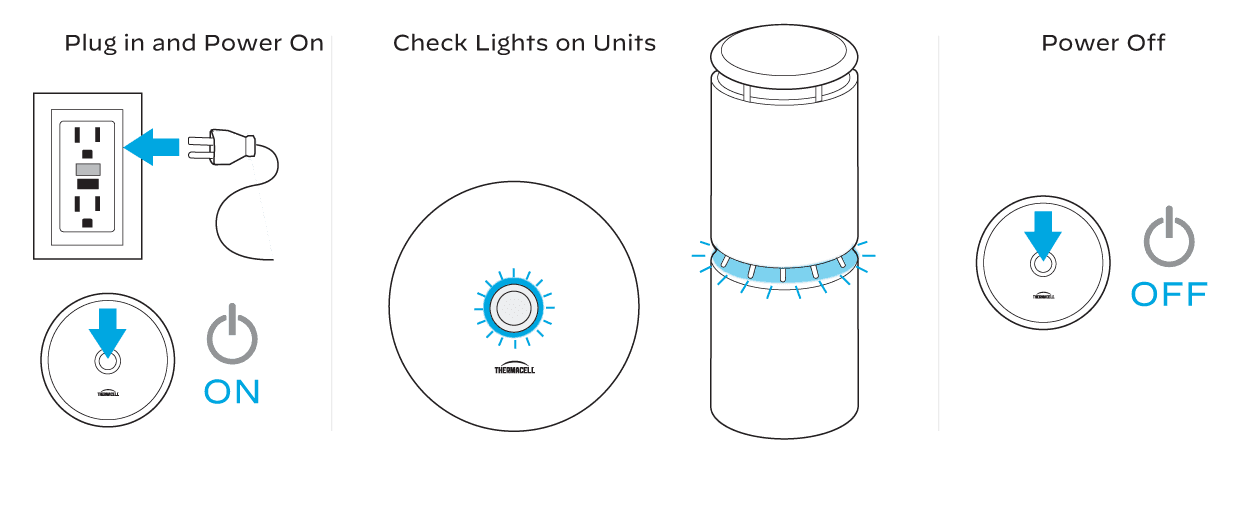
Test the System
Plug the Hub into the Outlet
Press the Center Power Button
Confirm the Ring Around the Button Illuminates
Each Repeller Should Begin Flashing a Chasing Amber Pattern
After 15 Minutes, Lights Should Turn Solid Blue
If No Lights Appear, Recheck All Connections
Turn Off the system by Pressing the Power Button on the Hub
Continue with Final installation of the Repellers and Cables
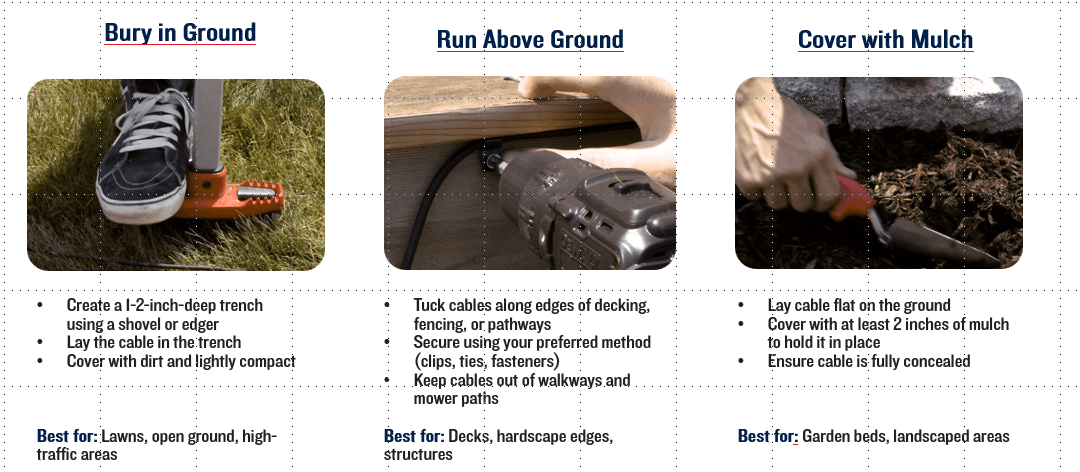
Secure the Cables
Finish your installation by routing and securing your cables to prevent damage, avoid tripping hazards, and provide a professionally installed appearance.
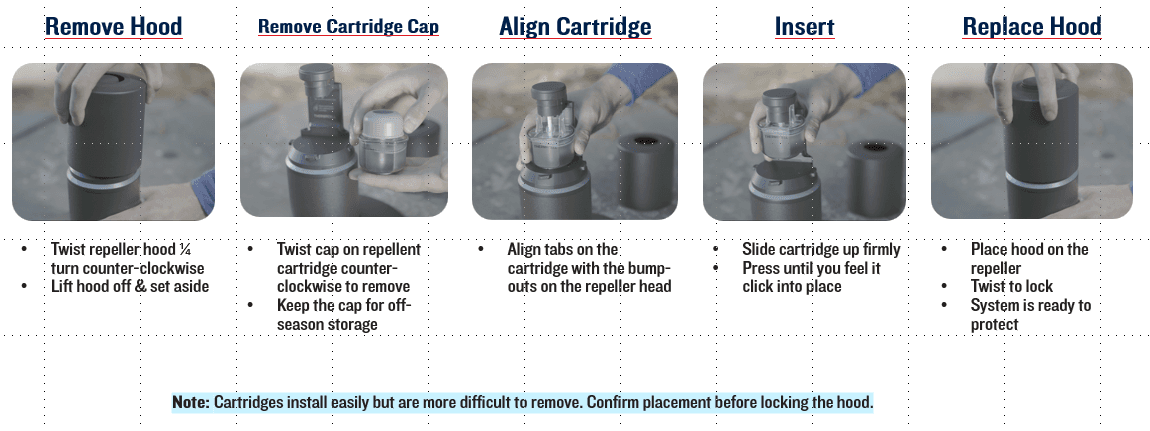
Insert the Repellent Cartridges
Connect the Hub to the LIV+ 2 App
LIV Features with the LIV+ 2 App
- Set Schedules
- Set Timers
- LED Lighting Selection
- Push Notifications
- Refill Life Remaining
- Share Access to the System
- Automatic Firmware Updates Sent to your System
LIV Features Without Wi-Fi
- Mosquito Repellency
- Reset Refill Life
- Factory Reset
- Repeller Status
- Refill notify via Repeller lights @ 20%, 10% and 0%
- Auto Shutoff After 6 Hours of Runtime
- Note: Important firmware updates can't be sent to your system unless it's connected to the app


Ensure the device is connected to a 2.4 Ghz network. The LIV+ 2 App only works on 2.4 Ghz networks.
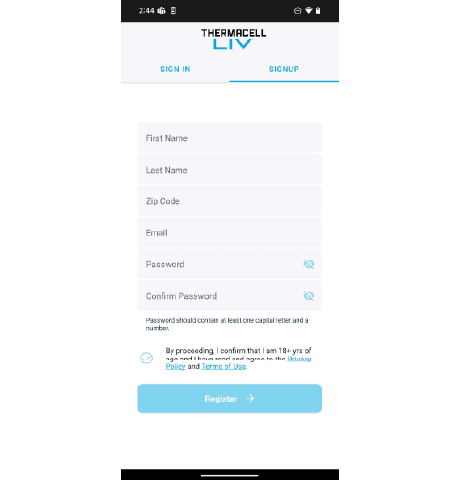
- Sign Up for an Account
- Select "Sign up" at the top of the screen.
- Enter the information as prompted and select the checkmark at the bottom of the page when done entering and select "Register".
- You will be sent to the Verification page. Wait for the email sent with the verification code, then enter the code. Select "Verify".
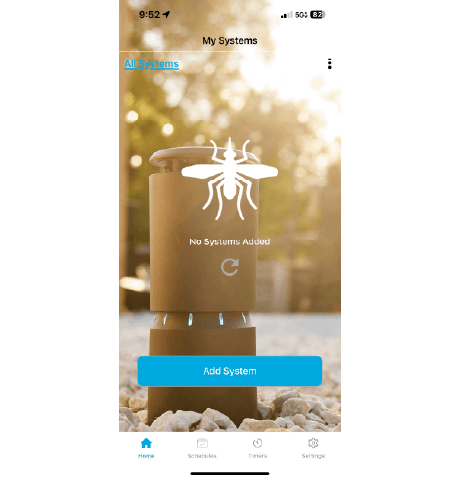
2. Select "Add System"
3. Select "Set Up WiFi"
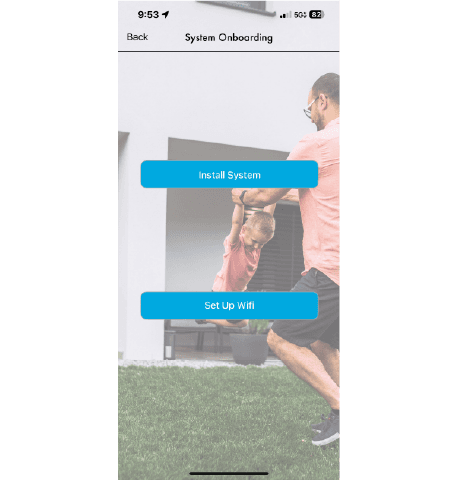
4. Aim camera at the QR Code
5. Select your WiFi, Enter Password, and Select"Start"
6. Wait for the Checklist to complete
7. Enter Name of the Hub and Select "Done"
If you are still having issues, reach out to the appropriate support department:
If you purchased your system via a Pro: jcash@thermacell.net
If you purchased your system via www.thermacell.com: customerservice@thermacell.com
Getting to Know Your System
Enter Refill Selection Mode If Not Connected to Wi-Fi
Upon inserting refills into your LIV system, you will need to reset the refill life. Please follow these instructions:
- Turn the System On
- Press and hold the hub power button down for 5 seconds
- LED will turn purple
- Once LED flashes, release the hub power button
- Click the hub power button to cycle through cap color
▪ Yellow - 40 hours
▪ Blue – 100 hours
▪ Gray - 180 – PROS Only - Hold and press the Hub power button for 3 seconds and release button to lock in refill life
Reset the Hub
Resetting the Hub brings it back to factory settings. To reset the Hub:
- Hold the hub power button
- You will see 5 purple flashes
- Keep holding for another 20 seconds until you see a blue flash
- Once you see the blue flash release the button
HELPFUL TIPS
- Give it a Few Minutes - Our repellent is heat activated and the repellers can take 5 minutes to warm up before releasing repellent at optimal levels. Allow a few more minutes for full area protection.
- Don’t Worry - LIV is programmed to automatically shut off after 6 hours of continuous use.
- Repellent Life - Designed to last for long-lasting use. Actual lifespan may vary depending on environmental conditions. Replace cartridges when empty and dispose of used cartridges in the trash. Keep the caps of newly installed cartridges. If not in use for extended periods, especially in hot climates, remove the cartridges from the repellers and screw on the cap. Refer to label packaging for safety precautions and full disposal instructions.
- End of Season Care - Depending on your location, mosquito protection may not be required year round. If not in use for extended periods, remove the cartridges, replace the caps and store them in a cool, dry place until needed again. Keep out of reach of children and pets.
What Comes in the Repeller Box
What comes in the Hub Box
Before You Plan Your System
Coverage Area
- Is this a clear, defined area people use?
- How many repellers will it take to effectively cover the area?
Power and WiFi
- Is there a GFCI outlet within reach of the coverage area? 120V required
- Is there a WiFi signal nearby for setup and monitoring?
Layout and Cabling
- Can I run cables cleanly and safely?
- Do cable distances stay within system limits?
Environment
- Are there obstructions (dense plants, walls and water exposure) to plan around?
- Do I see good mounting options?
How to Approach Configuration
Survey Your Space
- Identify the areas you want to protect and where the hub can be mounted
- Confirm optimal repeller placement based on seating, power and WIFI access
Layout Repellers
- Repellers go in one direction starting from the hub. Repellers cannot split directions, nor do they circle back to complete a circuit.
- Place repellers on the ground where they will be installed
- Measure distances between repellers and from the first repeller to the hub
- Each hub can support up to five repellers
Create a Perimeter
- Build a perimeter around the spaces people use most
- Space repellers no more than 20 feet apart
- Place repellers within 10 feet of seating and gathering areas for best protection
Tools Needed
Mount the Hub
Choose the Right Location
- Within range of 2.4 GHz WiFi Network
- Within 6 feet of a GFCI Outdoor Outlet (120V)
- At least 30 inches off the ground to avoid water and snow
Mount the Hub
- Hub must be mounted vertically
- Use the provided mounting plate to mark screw holes
- Ensure the plate is level
- Drill holes and install the plate using the provided screws
Install the Hub
- Hang the hub securely on the mounting plate
- Ensure the power cable is fully inserted
- Route cables facing downward or protected from the elements
Leave the Hub Unplugged Until Testing Step
Mount the Repellers
Depending on your installation and selected hardware, follow the appropriate step below to attach a repeller.
Standard Mount - Decks, Railings and Flat Wood Surface
- Secure the mount directly to the surface using deck screws
- Route cables through the cutout in the mount
- Slide the repeller onto the mount until it clicks into place
Ground Stake - Lawns, Garden Beds and Mulch Areas
- Push stake in by hand until just above ground level (Do not use a hammer or mallet)
- Twist the standard mount onto the stake until finger-tight
- Align push tabs and pass pigtail connectors through cutouts
- Slide the repeller onto the mount until it clicks
Hardscape Base - For Stone, Pavers, Decking, or Other Hard Surfaces Where Drilling is Not Desired
- Twist the standard mount into the threaded center of the base
- Pass pigtail connectors through the bottom of the base
- Slide the repeller onto the mount until it clicks
- Place base on surface, ensuring cables sit in the edge cutout
Side Mount - For Decks and Vertical Hard Services
- Position the side mount and mark hole locations
- Pre-drill two holes and secure side mount with appropriate screws
- Twist the standard mount onto the side mount
- Route cables through cutouts and install the repeller
- Secure cables with a zip tie.
Connect the Cables - **MAKE SURE THE HUB IS UNPLUGGED**
Start at the hub
- Connect one end of a 24-ft cable to the hub
- Thread finger-tight only (do not over-tighten)
- Do not plug in the hub yet
Connect the first repeller
- Connect the other end of the cable to the first repeller pigtail
Continue the chain
- Connect each repeller to the previous one in the chain
- Route cables where they will be secured later
- Keep cables unburied for now
Finish the chain
- Place the terminator on the final repeller at the end of the longest chain
Test the System
Plug the Hub into the Outlet
Press the Center Power Button
Confirm the Ring Around the Button Illuminates
Each Repeller Should Begin Flashing a Chasing Amber Pattern
After 15 Minutes, Lights Should Turn Solid Blue
If No Lights Appear, Recheck All Connections
Turn Off the system by Pressing the Power Button on the Hub
Continue with Final installation of the Repellers and Cables
Secure the Cables
Finish your installation by routing and securing your cables to prevent damage, avoid tripping hazards, and provide a professionally installed appearance.
Insert the Repellent Cartridges
Connect the Hub to the LIV+ 2 App
LIV Features with the LIV+ 2 App
- Set Schedules
- Set Timers
- LED Lighting Selection
- Push Notifications
- Refill Life Remaining
- Share Access to the System
- Automatic Firmware Updates Sent to your System
LIV Features Without Wi-Fi
- Mosquito Repellency
- Reset Refill Life
- Factory Reset
- Repeller Status
- Refill notify via Repeller lights @ 20%, 10% and 0%
- Auto Shutoff After 6 Hours of Runtime
- Note: Important firmware updates can't be sent to your system unless it's connected to the app
Ensure the device is connected to a 2.4 Ghz network. The LIV+ 2 App only works on 2.4 Ghz networks.
- Sign Up for an Account
- Select "Sign up" at the top of the screen.
- Enter the information as prompted and select the checkmark at the bottom of the page when done entering and select "Register".
- You will be sent to the Verification page. Wait for the email sent with the verification code, then enter the code. Select "Verify".
2. Select "Add System"
3. Select "Set Up WiFi"
4. Aim camera at the QR Code
5. Select your WiFi, Enter Password, and Select"Start"
6. Wait for the Checklist to complete
7. Enter Name of the Hub and Select "Done"
If you are still having issues, reach out to the appropriate support department:
If you purchased your system via a Pro: jcash@thermacell.net
If you purchased your system via www.thermacell.com: customerservice@thermacell.com
Getting to Know Your System
Enter Refill Selection Mode If Not Connected to Wi-Fi
Upon inserting refills into your LIV system, you will need to reset the refill life. Please follow these instructions:
- Turn the System On
- Press and hold the hub power button down for 5 seconds
- LED will turn purple
- Once LED flashes, release the hub power button
- Click the hub power button to cycle through cap color
▪ Yellow - 40 hours
▪ Blue – 100 hours
▪ Gray - 180 – PROS Only - Hold and press the Hub power button for 3 seconds and release button to lock in refill life
Reset the Hub
Resetting the Hub brings it back to factory settings. To reset the Hub:
- Hold the hub power button
- You will see 5 purple flashes
- Keep holding for another 20 seconds until you see a blue flash
- Once you see the blue flash release the button
HELPFUL TIPS
- Give it a Few Minutes - Our repellent is heat activated and the repellers can take 5 minutes to warm up before releasing repellent at optimal levels. Allow a few more minutes for full area protection.
- Don’t Worry - LIV is programmed to automatically shut off after 6 hours of continuous use.
- Repellent Life - Designed to last for long-lasting use. Actual lifespan may vary depending on environmental conditions. Replace cartridges when empty and dispose of used cartridges in the trash. Keep the caps of newly installed cartridges. If not in use for extended periods, especially in hot climates, remove the cartridges from the repellers and screw on the cap. Refer to label packaging for safety precautions and full disposal instructions.
- End of Season Care - Depending on your location, mosquito protection may not be required year round. If not in use for extended periods, remove the cartridges, replace the caps and store them in a cool, dry place until needed again. Keep out of reach of children and pets.
Troubleshooting
Light Sequences
Component | Light Sequence | Description | Resolution |
Repeller | Chasing Amber | Unit is Warming Up | Normal Sequence |
Repeller | Solid Blue | Unit is At Temperature | Normal Sequence |
Repeller | Flashing Red | Refill is Missing | Insert a Refill |
Repeller | Periodic Flashing Red | Repellent Cartridge is Getting Low | Order More Refills |
Repeller | Solid Red | Refill Cartridge is Empty | Replace Refills and Reset Refill Life |
Repeller | Flashing Red and White | Temperature Issues | Call Thermacell Pro Support |
Repeller | Solid Green | Communication Error | Call Thermacell Pro Support |
Repeller | Flashing Blue and Yellow | Repeller is Tilted or Knocked Over* | Ensure the Repellers are Upright |
Repeller | Flashing Orange and Operating Color | Cap Obstruction* | Clear Obstruction and Move Cap to Closed Position |
Hub | Rapidly Flashing | Error | Call Thermacell Pro Support |
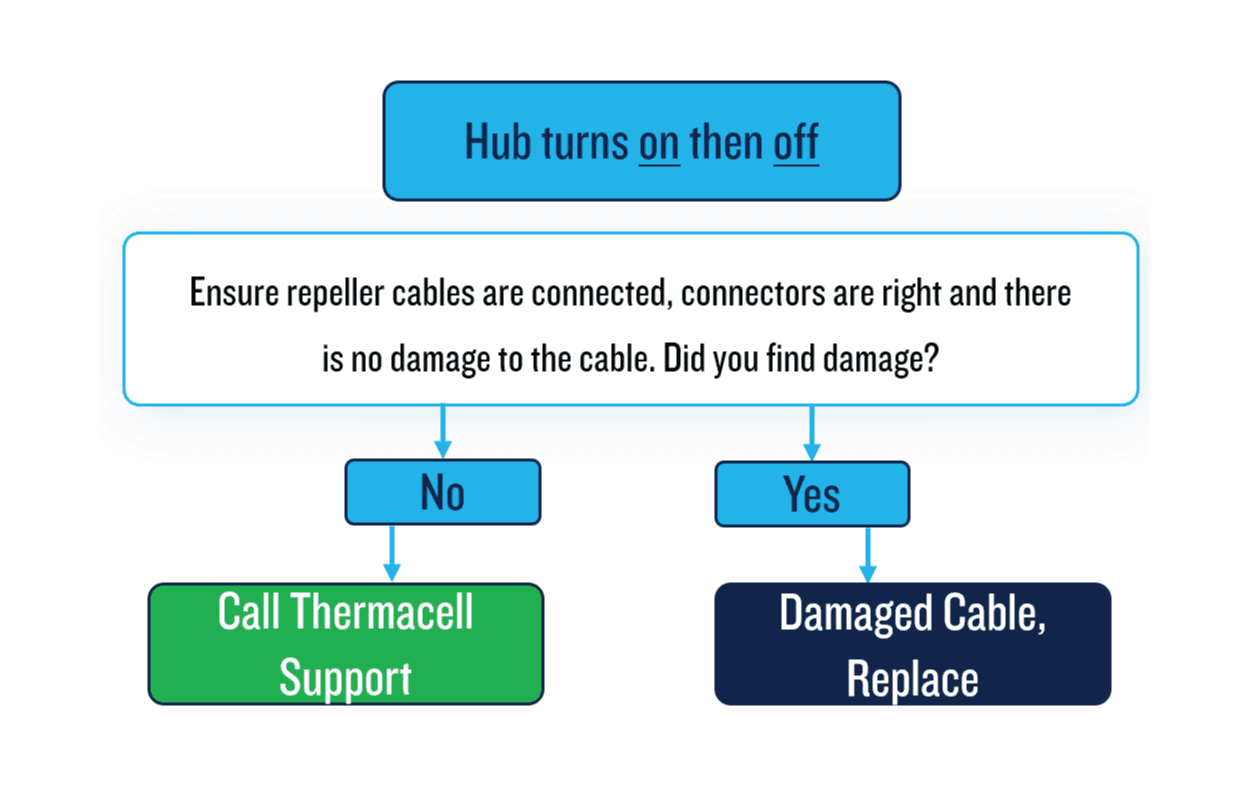
Hub | Flashes 3 Times and Shuts Off | Cable or Repeller Error | Check the Cables and Repellers |
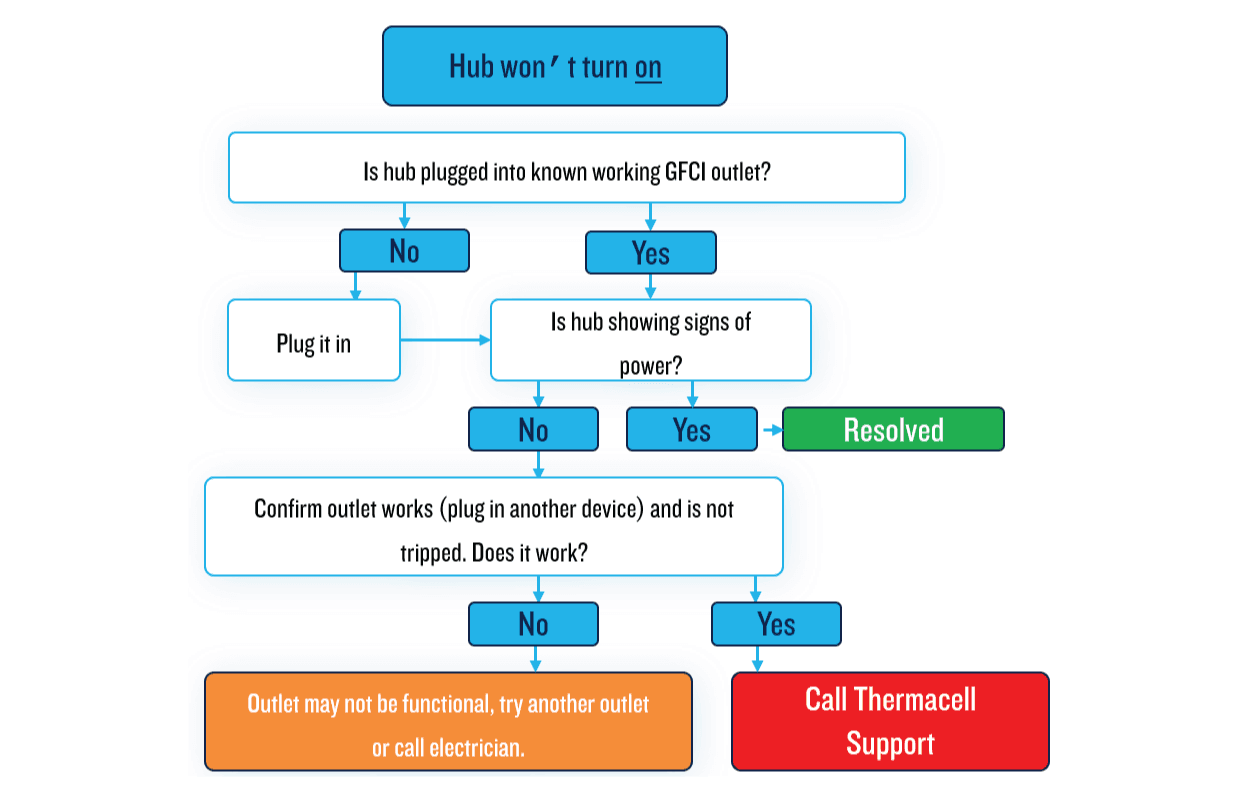
Hub | No LED on the Power Button | Unit has Blown a Fuse | Call Thermacell Pro Support |
* Gen 2 Repeller |
Hub has No Power
Hub Flashes 3 Times and Shuts Off
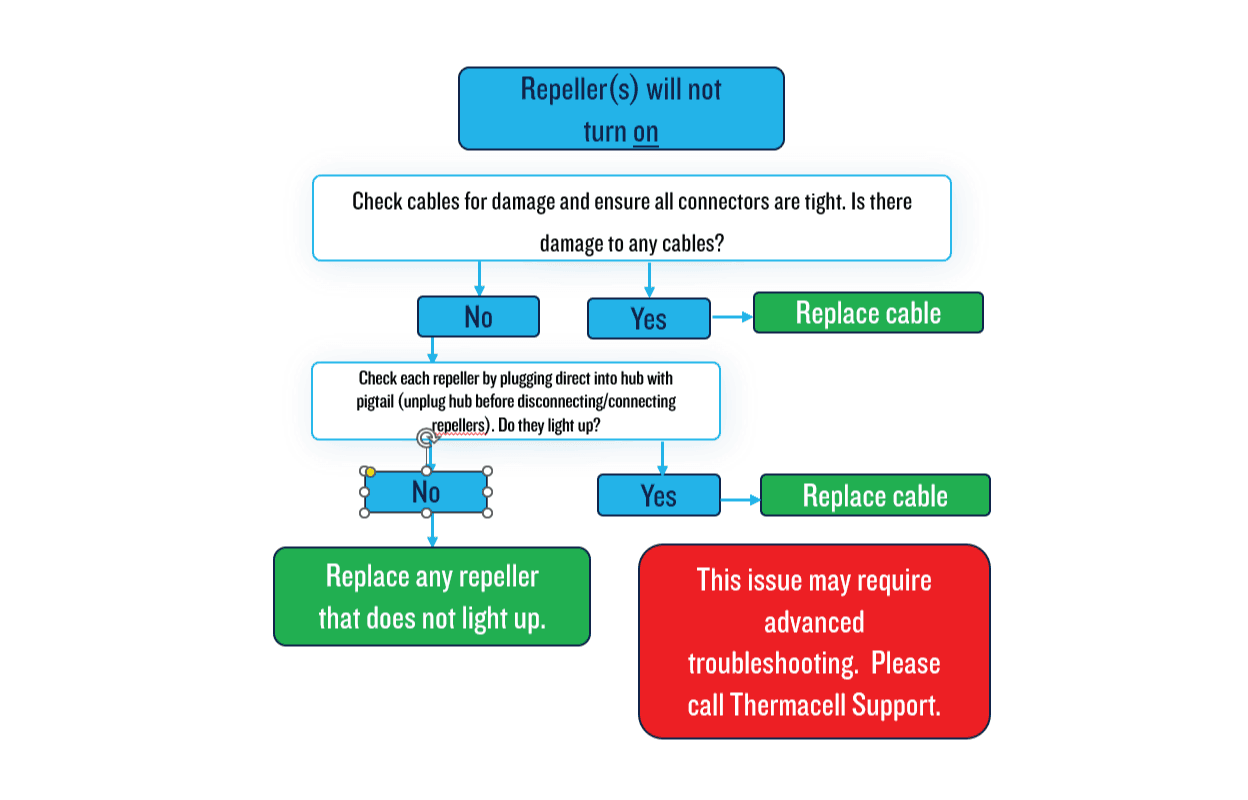
Repeller Has No Power
Tips for Success
- Clean the repellers regularly to ensure peak performance. Dirt buildup or weathering can occur from exposure to lawn clippings, hard water, or other environmental factors. Use a damp cloth or alcohol wipe for thorough cleaning.
- Always unplug the Hub before connecting and disconnecting repellers.
- After installing, reset the Hub to run for 180 hours since the default runtime is 40 hours.
- Make sure the Hub is mounted vertically with wires facing down to function correctly.
- If the app onboarding process encounters issues, perform a factory reset on the Hub.
- When Wi-Fi signal is weak during onboarding, unplug the Hub, move it closer to the router, and restart onboarding. Once completed, place the Hub back in its original spot and check the connection.
- Install repellers 2 to 4 inches above the ground.
- Keep repellers at least 18 inches away from plants, walls, or other obstructions for best results.
- Adhere strictly to the maximum cable length guidelines to maintain system operation.
- Keep the refill caps after installation for use during system winterization.
- Finish installation by guiding users through the app and providing a leave-behind for system reference
- Avoid setting the repeller color to red, as it can be mistaken for a refill error indicator.
- Technicians should always bring extra components when going to a service call.
- LIV requires a 2.4 GHz network. If you do not have a dedicated 2.4 GHz Wi-Fi network available, contact your internet service provider or network administrator and request a separate 2.4 GHz guest network for LIV devices. This can help ensure reliable connectivity and simplify device setup.
LIV 2.0 Repellers - Things to Note
- The new cap on the repeller snaps on and off. If the cap unexpectedly comes off, you can easily snap it back into place.
- After enumeration, the cap will open. If there is an obstruction, the repeller will flash orange along with the operating color. Simply remove the obstruction and move the cap to close it. After a minute, the cap will automatically reopen.
- During cool-down (when the hub is powered off), repellers will display a blue chase until the heater cools down. Once this happens, the cap will close automatically.
- The terminator, which is located in the hub box, must be installed on the last repeller of the longest chain.
- The screw caps, which come installed on the female pigtail of the repeller, should remain installed on the last repeller of the shorter chains (if the splitter is used).
Light Sequences
Component | Light Sequence | Description | Resolution |
Repeller | Chasing Amber | Unit is Warming Up | Normal Sequence |
Repeller | Solid Blue | Unit is At Temperature | Normal Sequence |
Repeller | Flashing Red | Refill is Missing | Insert a Refill |
Repeller | Periodic Flashing Red | Repellent Cartridge is Getting Low | Order More Refills |
Repeller | Solid Red | Refill Cartridge is Empty | Replace Refills and Reset Refill Life |
Repeller | Flashing Red and White | Temperature Issues | Call Thermacell Pro Support |
Repeller | Solid Green | Communication Error | Call Thermacell Pro Support |
Repeller | Flashing Blue and Yellow | Repeller is Tilted or Knocked Over* | Ensure the Repellers are Upright |
Repeller | Flashing Orange and Operating Color | Cap Obstruction* | Clear Obstruction and Move Cap to Closed Position |
Hub | Rapidly Flashing | Error | Call Thermacell Pro Support |
Hub | Flashes 3 Times and Shuts Off | Cable or Repeller Error | Check the Cables and Repellers |
Hub | No LED on the Power Button | Unit has Blown a Fuse | Call Thermacell Pro Support |
* Gen 2 Repeller |
Hub has No Power
Hub Flashes 3 Times and Shuts Off
Repeller Has No Power
Tips for Success
- Clean the repellers regularly to ensure peak performance. Dirt buildup or weathering can occur from exposure to lawn clippings, hard water, or other environmental factors. Use a damp cloth or alcohol wipe for thorough cleaning.
- Always unplug the Hub before connecting and disconnecting repellers.
- After installing, reset the Hub to run for 180 hours since the default runtime is 40 hours.
- Make sure the Hub is mounted vertically with wires facing down to function correctly.
- If the app onboarding process encounters issues, perform a factory reset on the Hub.
- When Wi-Fi signal is weak during onboarding, unplug the Hub, move it closer to the router, and restart onboarding. Once completed, place the Hub back in its original spot and check the connection.
- Install repellers 2 to 4 inches above the ground.
- Keep repellers at least 18 inches away from plants, walls, or other obstructions for best results.
- Adhere strictly to the maximum cable length guidelines to maintain system operation.
- Keep the refill caps after installation for use during system winterization.
- Finish installation by guiding users through the app and providing a leave-behind for system reference
- Avoid setting the repeller color to red, as it can be mistaken for a refill error indicator.
- Technicians should always bring extra components when going to a service call.
- LIV requires a 2.4 GHz network. If you do not have a dedicated 2.4 GHz Wi-Fi network available, contact your internet service provider or network administrator and request a separate 2.4 GHz guest network for LIV devices. This can help ensure reliable connectivity and simplify device setup.
LIV 2.0 Repellers - Things to Note
- The new cap on the repeller snaps on and off. If the cap unexpectedly comes off, you can easily snap it back into place.
- After enumeration, the cap will open. If there is an obstruction, the repeller will flash orange along with the operating color. Simply remove the obstruction and move the cap to close it. After a minute, the cap will automatically reopen.
- During cool-down (when the hub is powered off), repellers will display a blue chase until the heater cools down. Once this happens, the cap will close automatically.
- The terminator, which is located in the hub box, must be installed on the last repeller of the longest chain.
- The screw caps, which come installed on the female pigtail of the repeller, should remain installed on the last repeller of the shorter chains (if the splitter is used).
App Overview
App Features
How to Power the System On and Off
- Open the LIV+ 2 App
- Select the System
- Press the power slider for the Hub to On.
- Press the power slider for the Hub to Off.
System State
- Off
- Warming
- Protected
Global Status
- Off
- Warming
- Protected
- Soft Error (yellow repeller) - Unplug device, wait 30 seconds before plugging back in
- Hard Error (red repeller) - call Thermacell support
Reset Refill Life
- Open the LIV+ 2 App and Select the System.
- Press Reset and select the correct refill duration.
- Select Confirm.
Setting up Schedules
- Open the LIV+ 2 App and select Schedules in the bottom navigation bar
- Press Add Schedules (or select the + in the top right)
- Press Add Schedule.
- Press Name and type in a name for the schedule. Then, select Done
- Press the Time in the time block and set the time
- Press Actions and select the name of the System. Select the Check Mark to Enable Repellers and ensure the slider next to Enable Repellers to the right on. Then, select Done and Save. You will need to repeat the same step to turn off the repeller by unchecking Enable Repellers and ensuring the slide next to Enable Repellers is set to Off.
Setting Timers
- Open the LIV+ 2 App and click Timers in the bottom navigation bar.
- Press Add Timer (or select teh + in the top right)
- Press System Select. Then, press the checkmark next to the system under test. Then, press Done.
- Set the time for the desired duration. Then, press Save. You will be directed back to the Timers Page
Create A Group
- Open the LIV+ 2 App and click the ⋮ (vertical ellipses) in the top right of the Home page. Then, select Create Group.
- Type in a Name for the Group. Then, select Next Enter the name of the group.
- Click the empty box next to as many onboarded Hubs as you would like to include in the group. Select Done.
Notifications
- Open the LIV+ 2 App and click Settings in the bottom nagivation bar.
- Press Notifications.
- All Notifications relating to your LIV System can be seen on this page.
Sharing the App
- Open the LIV+ 2 App and select the system you want to share.
- Click the i icon in the top right of the screen.
- Click the Shared With dropdown.
- Click Add Members and enter the email of another user with an existing account.
- Shared User will need to navigate to their Notifications and Accept the Invite.
LED Hue and LED Brightness
- Open the LIV+ 2 App and Select the System - This will bring you to the Hub page.
- Use the LED Hue slider to select a color.
- Use the LED Brightness to set the brightness.
Common WiFi Issues
If you are having issues connection to the WiFi, please try the following steps:
Ensure you are connected to a 2.4 Ghz network and using the correct password.
Ensure the WiFi strength is strong enough to support onboarding by checking the hub WiFi strength from the hub mounting location:
Hold and press the Hub power button for 3 seconds and let go.
▪ Green = Good
▪ Yellow = OK
▪ Red = Bad
If WiFi is Ok or Bad, you may need to contact your internet service provider for additional options.
Check the security settings
LIV works with WPA2 encryption types.
Move the hub closer to the router
Sometimes bringing the hub closer to the router will solve connection issues. Once connected, move the hub back to the final mounting location.
Wi-Fi Authentication Failed
The Wi-Fi credentials provided are invalid. Reset the Hub and ensure the password is correct.
No bluetooth device found with the given prefix: Requires a Hub Reset
- Confirm that the blue LED around the power button is off.
- Press and hold the power button.
- You’ll see five purple flashes, followed by a blue flash.
- Release the button immediately when you see the blue flash.
- The hub light will begin flashing—this is normal.
- Wait until the flashing stops.
- Once the hub powers down, leave it off.
- Begin the onboarding process within 2 minutes.
User node mapping failed:
- Unplug the hub from the power source.
- Wait 30 seconds, then plug it back in.
- The hub light will begin flashing—this is normal.
- Wait until the flashing stops.
- Once the hub powers down, leave it off.
- Begin the onboarding process within 2 minutes.
Tips for Success
Connect the Customer to the Correct 2.4 GHz Network:
- Ensure the device is connected to the 2.4 GHz Wi-Fi network, as LIV is optimized for this frequency.
- Ask your customer to contact the internet provider and enable a 2.4 GHz network before final installation.
- Enabling a Dual Band Wi-Fi network is simple for a lot of carriers and can be found on their website.
- Make sure the customer has their Wifi password handy
Verify Security Settings:
- LIV functions best with WPA2 encryption. Double-check that the router is using WPA2 security for the connection.
Move the Hub Closer to the Router:
- During the onboarding process, position the hub closer to the router to ensure a stable connection.
- Once the onboarding is complete, you can move the hub to its final mounting location.
Ensure Bluetooth Is discoverable/enabled on the Device